Tuesday, 10 April 2012
Evaluation
The videos below are of my evaluation, which I had to separate in 6 videos as youtube wouldn't allow me to upload one very long one.
Tuesday, 27 March 2012
Monday, 26 March 2012
Final Poster
Poster
This is the poster I have created for my short film, which was done through photoshop and planned to fit in with the common conventions of existing independent film posters. I have used aspects from the Snowtown poster such as the star ratings, quotes from institutions and images of the lead actors. I also decided to include the location of one of the scenes behind the characters because I feel it links itself well to the Tyrannosaur poster that I analysed, which features a northern council estate in the background.
I decided to use white as a main colour throughout this poster as I feel it really goes perfectly with some of the scenes in my film, which are deliberately washed out and bleak which connotes heaven and a dream like state. I feel that this poster will attract a target audience who can guess what the film is going to be like, through the use of colour to create mood, reviewer's quotes, star and age rating I feel that this poster will attract my target audience to see my film.
Saturday, 24 March 2012
Final magazine double page
Magazine Scribd
This is my flat plan for the magazine double page that I intend to create in Adobe Indesign CS5.5. I have taken conventions from existing film magazines such as Empire and Little White Lies, such as the round corners on the main image, as seen in LWL and the symmetrically of the double page layout with the use of four columns to fill up the page. In the images I intend to feature my images from the film of two actors, Dan Annear and Jake Clutsom. I have chosen to do this because the readers can see the location of the film aswell as the actors too, therefore making the viewer more interested in the film and giving them a sneak peek into the featured product. Other conventions have been included too, such as the exaggerated first letter, the page numbers at the bottom and the name of the film in bold at the top of the page.
In terms of colour, I have decided to follow a similar scheme to Little White Lies because I feel that its influence on the independent film scene makes it more suited to my target audience. I will use a block coloured background of black, with white text and title. This is a lot more interesting than using black on white, because it will make the text stand out a lot more and is seen to be unusual due to white on black being used quite often.
I have chosen to use Indesign for creating this magazine as Photoshop doesn't have the same features for using columns and also Indesign is a more professional tool that designers in the media industry actually use. Although I don't know how to use it as well as Photoshop I feel that I could probably learn it and look online for tutorials if necessary.
Tuesday, 20 March 2012
Before and after Colouring
These two images show the before and after of the colouring process, which I used Final Cut Studio's colour grading program 'Color'.

As you can see, this image is very plain, washed out and slightly overexposed. The skin tone is dull, and although very clinical I would like to create more atmosphere for the opening scene. This is just as I shot it though the camera. When colouring, I feel that it's better to over expose and turn it down, than to over expose your shot.

As you can see, I have added contrast to really bring out the detail in the face to make the Elder look ill. The contrast also helps to bring out the light and darks in the hair to create even more interest. I darkened this clip down to really contrast with the clip after it when the Elder wakes up in a really bright, bleach bypassed scene. More tonal colour is brought out too, such as the wall behind and the red on the neck, which really gives a great effect. In photoshop, I created two black horizontal lines with no background, which I imported into Final Cut Pro as a .psd file. Then I scaled it up to re-create a letter-boxing technique that I then applied to the whole film and adjust the clips framing accordingly. This in turn creates a wonderfully cinematic feel, which fits in well with all the short films I have analysed.
Monday, 19 March 2012
Colour grading process
A video showing how I went about colour grading after I had edited my film together.
Saturday, 17 March 2012
Thursday, 15 March 2012
Saturday, 10 March 2012
Tuesday, 6 March 2012
Editing Screenshots
A video of my screenshots that I have taken while editing, as I talk about how I went about producing the film.
Thursday, 1 March 2012
Filming scene 3
These are some screenshots that I took from my footage of scene 2 in the Hair and Beauty department at Woods Browning, which I made to look like a hospital, shot in the same bed, with the same lighting as scene 1 part 1 to really link the two characters together. I used three cameras for the dialogue parts, one on the brother in the hospital bed, one on the child, one on both of them. I used media's 600D, my 60D and Photography's 5D mkII in this set up. I also ran the dialogue through about four times, twice with this set up and then twice with different angles but focused on different actors. This helps to create a perfect continuity during the flow in speech and also gives me plenty of footage to play with. I used three tripods, one on wheels with a very smooth head and two static ones that don't have as smooth panning or tilts on each. This means that I only used one camera for all the movement, so I prioritised which camera is the best and used it for this, so the 5D mk II went on the Manfrotto tripod on wheels.


You may recognise some of these shots from my storyboard, but I also added a few more that I though I might need for editing. There wasn't much variation in camera shots when filming this scene, as I really wanted to focus more on the dialogue and acting rather than the fancy camerawork and interesting angles. This scene is a powerful one, and I wanted to make the most out of it. I thought the actors did quite well, but I wished that they had really tried to learn their lines in advance, however I feel it went to plan and the footage I have looks good, sharp and professional, which I think was tough to achieve because this is definitely the hardest scene to film and will be to edit too.
Wednesday, 29 February 2012
Filming scene 1 part 2 and scene 4
These are some screenshots that I took from my footage of scene 1 part 2 and scene 4 in the industrial unit up at Woods Browning, which I made to look like a blank empty warehouse type space. I used two cameras in the end but I only used them both at rare times, I really only used two because one had more of a wide angle lens, while one had one that was easier to zoom with, so I could tightly frame some shots. Although using two camera was good to create continuity, I couldn't help but think it wasn't entirely necessary, I could have just brought two different lenses with me. I used my own camera, and also the camera from my media department, which isn't as good as mine, but you barely notice the slight lack of quality. I used two very basic tripods, and if the photography department hadn't been locked up then I would have used the tripod on wheels so that I could smoothly pan and use camera movement in a fluid motion.


This footage isn't exactly how I want it to be in the final edit, so I will brightly colour it and add a bleach bypass effect to really make it seem like a dream/heaven. I lit this scene using a key lighting effect, with one light high up looking down which casts a warm tone onto the actors. Unfortunately there was lots of light being let into the building due to very large skylights on the roof of the space, so the lighting that I set up wasn't as effective as I would have wished. Although with some decent post production editing I know that this wont matter too much because the lights coming off the actor's faces will be able to seem very light and washed out with a simple effect added in Final Cut Pro, After Effects or Final Cut Studio's Color. Even though the setting that I was filming in had too much natural light that I couldn't shut off, I knew that this scene could still look good if I tried. The filming went smoothly, and after having a few run throughs and takes, I felt that I had enough footage to play with. I used a TASCAM BB800 connected via XLR cable to a Rode NTG-2 shotgun microphone on a boom pole to record the sound for this film, which meant I also had to monitor the sound levels as well as do all the actual filming. Luckily I had my dad there to hold the boom pole, so that I could set the sound levels, focus the cameras, click record on the sound, click record on the video and then monitor the audio via headphones while the cameras were rolling. Although a lot to think about, the quality of the sound produced was worth the effort and extra equipment, although I will still have to put the audio and video in sync during the editing process, which could also be another time consuming process.
Tuesday, 28 February 2012
Filming scene 1 part 1
These are some screenshots that I took from my footage of scene 1 part 1 in the hair and beauty section of Woods Browning, which I made to look like a hospital. I only used one camera in the end, although I had two more at my disposal. I only used one because I knew this was a very short scene and I could easily just create continuity easily. I didn't use my own camera, I used photography's Canon 5D mk II, which has 21 megapixels in relation to my 60D's 18 megapixels. I also used the department's Manfrotto tripod which had an excellent smooth head for tilting and panning, which I then mounted onto some wheels to create a smooth panning shot without having to set up a jib or track.


I was very pleased with the acting for this scene, as I though Derek did a fantastic job of dying because some actors can portray death very dramatically, but although quite dramatic, I thought it was a very cinematic moment which I thought worked really well with the intimate and close camera shots that I chose. I stuck to the storyboard slightly, but I also decided to experiment with focus pulling up the bed too. When it comes to the editing, I know that I might use as little as two shots for this scene, but having lots of footage is going to help if some of the shots I have aren't decent enough or I need more variation.
Tuesday, 21 February 2012
Filming scene 2
These are some screenshots that I took from my footage of scene 2 in the woods. It was a relatively straight forward one camera shoot, but I spent a lot of time trying to think about how to create continuity with Jake's movement in the scene. I stuck to my storyboard as much as I could, but in the end I changed a few shots that I thought were necessary and added some in that I felt had to be included. I feel that it is better to have too much footage when going into the editing process than not enough. Making sure the theme flowed smoothly was time consuming, but worth it in the end, as I think the shots that I have chosen below have good framing, such as following the rule of thirds to create interesting composition.


I think that this is a good start to filming my film, and if the rest of the scenes that I shoot go as well as this, then I think that this film will be successful!
Saturday, 18 February 2012
Equipment Lists
These are my equipment lists that I have made for each scene, showing what I need to bring with me to each location to help create a professional, high quality film:
 Scene 1 (part 1)
Canon 60D
Tripod on wheels
TASCAM BB-800
Rode NTG-2 Shotgun Microphone
XLR to XLR cable
1gb SD card
32gb SD card
Boom pole

Scene 1 (part 2)
Canon 60D
 Canon 600D
2x tripods
TASCAM BB-800
Rode NTG-2 Shotgun Microphone
XLR to XLR cable
1gb SD card
16gb SD card
32gb SD card
Boom pole
Scene 2
Canon 60D
Manfrotto Modosteady
Opteka Video Stabilizer
Tripod
 TASCAM BB-800
Rode NTG-2 Shotgun Microphone
XLR to XLR cable
1gb SD card
32gb SD card
Boom pole
Scene 3
Canon 60D
Canon 600D
Canon 5D mk II
 Tripod on wheels
2x other tripods
TASCAM BB-800
Rode NTG-2 Shotgun Microphone
XLR to XLR cable
1gb SD card
16gb SD card
32gb SD card
8gb Compact flash card
Boom pole
Scene 4

Canon 600D
2x tripods
TASCAM BB-800
Rode NTG-2 Shotgun Microphone
XLR to XLR cable
1gb SD card
16gb SD card
32gb SD card
Boom pole
Lots of this equipment is owned by myself, but I will also borrow various equipment from the media and photography departments in school.
Gauntlett goes to say that new media (and new media technologies) erodes the boundary between producer and audience to the extent that it makes little sense to talk about media audiences at all anymore: “Conventional research methods are replaced—or at least supplemented by new methods which recognise and make use of people's own creativity, and brush aside the outmoded notions of 'receiver' audiences and elite 'producers' (Gauntlett, 2007) This consequently erodes the boundary between the producer and the consumer, which is relevant through all my technology that I am using to shoot my film that wouldn't have been remotely available two years ago. I am lucky to be able to get my hands on this equipment, as some of it is rather expensive, but in relation to a fully budgeted feature film, the price of this equipment would be very minimal.
Gauntlett goes to say that new media (and new media technologies) erodes the boundary between producer and audience to the extent that it makes little sense to talk about media audiences at all anymore: “Conventional research methods are replaced—or at least supplemented by new methods which recognise and make use of people's own creativity, and brush aside the outmoded notions of 'receiver' audiences and elite 'producers' (Gauntlett, 2007) This consequently erodes the boundary between the producer and the consumer, which is relevant through all my technology that I am using to shoot my film that wouldn't have been remotely available two years ago. I am lucky to be able to get my hands on this equipment, as some of it is rather expensive, but in relation to a fully budgeted feature film, the price of this equipment would be very minimal.
Filming Dates
Now that I know all of my actors are onboard, I need to sort out when I can get them at different locations on different days to complete my filming. Unlike a budgeted film, my actors aren’t actually getting paid money to star in my film, so I am worried that there might be a lack of incentive to work or make time to come and film with me. I will have to see how this plans out. But for now I have drawn up a list of dates for filming each scene in each location:
Scene 1 part 1
27th February
Hospital/Hair and Beauty/Woods Browning
Scene 1 part 2 and scene 4
29th February
Industrial Unit/Woods Browning
Scene 2
20th February
Respryn Woods
Scene 3
1st March
Hospital/Hair and Beauty/Woods Browning
Scene 1 part 1
27th February
Hospital/Hair and Beauty/Woods Browning
Scene 1 part 2 and scene 4
29th February
Industrial Unit/Woods Browning
Scene 2
20th February
Respryn Woods
Scene 3
1st March
Hospital/Hair and Beauty/Woods Browning
Wednesday, 15 February 2012
Prop list
As a main part of mise en scene, props are a key aspect to consider when making a film. For instance, a period drama would need to have archaic items to create verisimilitude. But apart from creating realism and believability, props will also help support your narrative, for instance a dead rabbit is essential for my woods scene. Although I want to keep my props and scenery relatively low key, I want to create realism without having to try and create a particular time period. The following lists contain what props I will need for each scene:
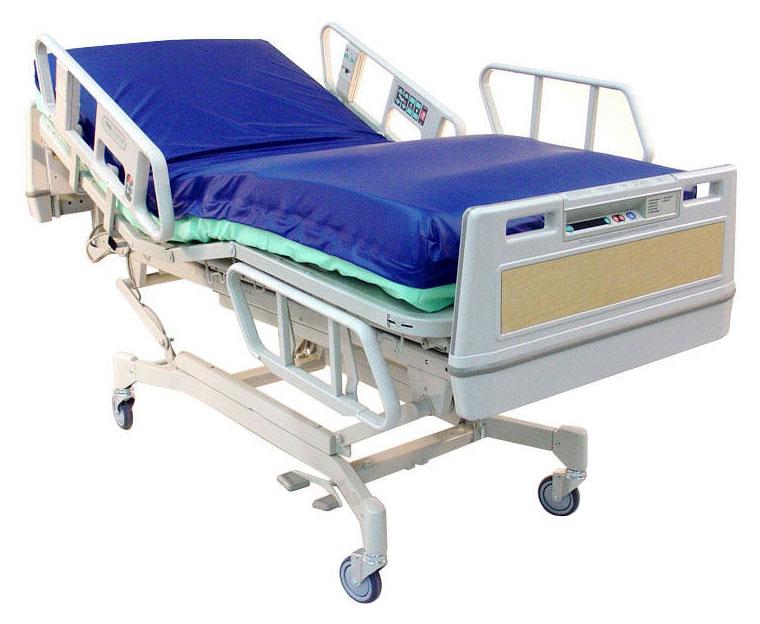 Scene 1 part 1 (Hospital)
Hospital bed
Bedsheets
Lamp
Medical equipment
Wire chair
Scene 1 part 2 (Empty space)
Fold out camp bed
Bedheads
Pillow
Scene 2 (Woods)
Fake blood
Dead rabbit
 Stones
Scene 3 (Hospital)
Hospital bed
Bedsheets
Lamp
Medical equipment
Wire chair
Scene 4 (Empty space)
Fold out camp bed
Bedheads
Pillow
Sunday, 12 February 2012
How I made my production company logo
This is a brief video consisting of screenshots which show how I created my production company logo in Adobe After Effects CS3.
Saturday, 11 February 2012
Distribution

“Distribution is about releasing and sustaining films in the market place. In the practice of Hollywood and other forms of industrial cinema, the phases of production, distribution and exhibition operate most effectively when 'vertically integrated', where the three stages are seen as part of the same larger process, under the control of one company. In the UK, distribution is very much focused on marketing and sustaining a global product in local markets.
In the independent film sector, vertical integration does not operate so commonly. Producers tend not to have long-term economic links with distributors, who likewise have no formal connections with exhibitors. Here, as the pig-in-the-middle, distribution is necessarily a collaborative process, requiring the materials and rights of the producer and the cooperation of the exhibitor to promote and show the film in the best way possible. In this sector, distribution can be divided into three stages - licensing, marketing and logistics.”
This is an interesting article, and it links to my production and leads me to the question ‘How will I distribute my film?’ A short film like mine would be released through the BBC with their short film scheme, or Film4 who are the same. Both of these companies independently fund British films, shorts and features, with both being vertically integrated. Film4 would have been the company that I would have tried to get funding from, so I feel that they would be the company to distribute them too, especially as it is part of their vertical integration system. As an independent filmmaker I will also upload my film to websites such as Vimeo and Youtube so that a community of other filmmakers and the public could watch my product and I wouldn’t be paying a fee, I wouldn’t be receiving money for my film too though, but because I didn’t actually pay much money for it anyway this doesn’t matter.
Friday, 10 February 2012
Colour grading research
Colour grading is something that is used in almost every piece of professional digital video and film work. Colour grading can take the form of simple colour correction such as correcting the overall tone, or can be used to give a particular look, for instance making a scene look warm or cold.
Wikipedia defines colour grading as
“Color grading is the process of altering and enhancing the color of a motion picture or television image, either electronically, photo-chemically or digitally”.
These days almost all colour grading is done digitally using various programs on different computers. Colour grading can consist of one or all of the following: changing brightness; changing contrast; adjusting white point; adding or removing red, green and blue; or applying filters.
Colour grading in it’s most basic form is usually used to either correct shots, like matching one shot with the next one, but can also be used to give a piece a look, or, for example, to make the sky more blue or someones skin look more flesh coloured.
Most video editing software contains some form of tool that’ll help the user to program colour correction and grading.These are some of the most common ones:

Final Cut Pro
Final cut pro contains some good colour correction tools; not the most extensive or the best sometimes, but it’ll certainly do the job alot of the time!
Color
If your serious about colour correction and intend to do alot of it, Color is part of Final Cut Studio and is very good at colour grading providing lots of tools for correcting problems or giving a scene a look. It can also send sequences between its Final Cut Studio brother ‘Final Cut Pro’.
After Effects
After Effects is another program that has some great inbuilt colour grading tools, there are also a number of plug-ins available to extend it’s capabilities such as Red Giant’s Colourista II, this plug-in is also available for Final Cut too. Premiere Pro
Premiere pro has a similar toolset for colour grading to Final Cut, not the best but certainly more than capable for most jobs.
Avid
Avid is another video editing programme that can be used to colour grade, with a very robust set of tools.
In terms of my film, I intend to use Final Cut Pro and Final Cut Studio’s Color to really add a certain feel to my film. The good thing about both of these products being Final Cut is that they are integrated with each other, so a sequence I create in Final Cut can be export to Color in a few clicks. If I need to learn more about how to actually colour grade, then I will look on the Vimeo Video School to look at some tutorials, but for now I know what to do.

Wikipedia defines colour grading as
“Color grading is the process of altering and enhancing the color of a motion picture or television image, either electronically, photo-chemically or digitally”.
These days almost all colour grading is done digitally using various programs on different computers. Colour grading can consist of one or all of the following: changing brightness; changing contrast; adjusting white point; adding or removing red, green and blue; or applying filters.
Colour grading in it’s most basic form is usually used to either correct shots, like matching one shot with the next one, but can also be used to give a piece a look, or, for example, to make the sky more blue or someones skin look more flesh coloured.
Most video editing software contains some form of tool that’ll help the user to program colour correction and grading.These are some of the most common ones:
Final Cut Pro
Final cut pro contains some good colour correction tools; not the most extensive or the best sometimes, but it’ll certainly do the job alot of the time!

Color
If your serious about colour correction and intend to do alot of it, Color is part of Final Cut Studio and is very good at colour grading providing lots of tools for correcting problems or giving a scene a look. It can also send sequences between its Final Cut Studio brother ‘Final Cut Pro’.
After Effects
After Effects is another program that has some great inbuilt colour grading tools, there are also a number of plug-ins available to extend it’s capabilities such as Red Giant’s Colourista II, this plug-in is also available for Final Cut too.
Premiere pro has a similar toolset for colour grading to Final Cut, not the best but certainly more than capable for most jobs.
Avid
Avid is another video editing programme that can be used to colour grade, with a very robust set of tools.
In terms of my film, I intend to use Final Cut Pro and Final Cut Studio’s Color to really add a certain feel to my film. The good thing about both of these products being Final Cut is that they are integrated with each other, so a sequence I create in Final Cut can be export to Color in a few clicks. If I need to learn more about how to actually colour grade, then I will look on the Vimeo Video School to look at some tutorials, but for now I know what to do.

Thursday, 9 February 2012
Editing research

When researching into editing techniques that I could use on my film I came across an interesting article written by Oliver Peters, an independent film editor and colourist, who explains his top twelve tips for film editing. This article is huge and really well written, so I shall post a link to it below, whilst quote a few tips that I feel that I will use the most.
“Moving camera shots – Moving the camera around is a staple of action sequences. This might be a camera on a dolly, crane, Steadicam or just handheld. In an action scene, this is designed to create a level of tension. When I cut these shots together, I prefer to cut on movement, so that the camera is in constant motion from one shot to the next. Many directors and DP will disagree, preferring instead to start and stop each camera move before making the cut. Both approaches work under the right situations, but my tendency is to cut tighter and not let the audience’s eye rest on the set or a shot or a scene for too long, unless there is a reason to do so.”
This technique is something that I have decided to storyboard into my storyboard mainly for the woods scene when the action is mainly following the child playing in the woods and discovering the dead rabbit. From this, I have also decided to use short and sharp cuts on the childs hands and expression in the lead up to discovering the rabbit, with eventually a long slow zoom into the dead animal.
“Pull the air out of actors’ performances – Going back to Item 1 – I like to cut tight. Recognize that many actors will overact. They will milk a scene for more than is appropriate. They will accentuate pauses, add more stumbles and stammers (where scripted) and give lengthy glances. Sometimes this works, but your job as the editor is to dial these back as you cut. Take these pauses out by cutting away and then back. Cut out redundant actions and line deliveries. Make it real, so it doesn’t feel like ACTING.”
This is undoubtedly something that I will have to do as an editor for this film, as when I first auditioned the cast for my film I could evidently tell that they over acted. I knew this would be something I would get with any actor, as the screenplay is very dramatic, even myself as an actor would struggle to give a convincing screen performance.
Wednesday, 8 February 2012
Existing production company logos
Before creating my production company company logo, I thought it was only right to look at some existing logos from the British film industry. This will hopefully give me some inspiration into how I intend to create my production company logo and what it will look like. As David Bentley said "The making of the new and re-arranging of the old" (1997) and although these existing logos aren't exactly old, I can see them, take inspiration from them, and through taking companies that are similar to mine, I can therefore create a market successful product, or logo in this case.

This is for Warp Films, and it is very simple and when it somes up on screen it doesn't move. I like the simple graphics in black and white but I don't know if a title like this would fit my genre. This logo is particularly good because the fact that it is static means that is could go onto a film poster, therefore the viewer would tie a connection between the logo and the film, as logos are more simple to recognise then text is. The black and white could connote the films that they make, and therefore the viewer could associate warp films with old films in B&W too.

This is for DNA films which almost has a kind of scifi/horror theme to it with interesting graphics of close up cells or hair particles it looks like. This logo has decided to stay for warm red and oranges in terms of colour. It's also worth noting that this doesn't have 'films' or 'productions' written after it. There is a transition in this logo as the logo burns away. The red/orange within the colour scheme connotes anger, passion or blood, which may pass very emotive feelings to the viewer, although the warm colours sit well with the overall scientific feel.
This is the logo for Deadbeat Films, and I really love it because it's simple, sticks to good shades of black and white and has a good use of interesting graphics. I believe that this logo has movement on it as the man walks into the shot and then burns away. The white in this logo could connote heaven and purity, so a white theme could go really well for my production company logo because it would reflect the genre and themes from my film. The image of the person could also refer to the title and be a 'deadbeat', a lowlife or lazy person, only exaggerated by the way that they are standing and the dull shades of colour.
Personally, I think I should create a moving logo to really give my film a professional feel. I think that I should also make sure that my logo sticks to a simple colour scheme and a good font that fits with the film that I will make. After looking at these, I have decided to call my production company 'Hal Smith Productions' with this being written on screen in the sequence. I think that I will add a burning effect to the text, so it'll grow towards the screen and then burn away into the background. I plan to do this in After Effects with the skills that I have learnt in that program. I think that it is important to have the background black, because it's the start to a film and the start of a film is always black, so I think the beginning will flow a lot better.
Tuesday, 7 February 2012
Lighting research
The Three Point Lighting Technique is a standard method used in film, still photography and computer-generated imagery. It is a simple system that forms the basis of most lighting. I hope to understand this technique to help to create atmosphere and a professional quality to my film.
The technique uses three lights called the key light, fill light and back light:
 Key Light
This is the main light. It is usually the strongest and casts the most light on the scene. It is placed to one side of the camera/subject so that this side is well lit and the other side has some shadow.

Fill Light
This is the secondary light and is placed on the opposite side of the key light. It is used to fill the shadows created by the key. The fill will usually be softer and less bright than the key. To achieve this, I would intend to place some white sheeting over my light to diffuse it and soften the brightness.

Back Light
The backlight is placed behind the subject and lights it from the rear. Rather than providing direct lighting (like the key and fill), its purpose is to provide definition and subtle highlights around the subject. This set up would not be suited to my film because there would be too many cameras so I couldn’t create any movement with the camera. However, for still photography I think that this technique will become very useful.
So, for my filming, I intend to use either the key and fill light together to fully light my scene and actors. Lighting in film is only really necessary when using a 35mm camera to get the right exposure, but in digital film cameras such as DSLRs, this doesn’t matter, but low light shooting can produce a very grainy effect that could be suited to my film. For some of my scenes, such as when the Elder passes away could be done with just the key light to really cast shadows and create dramatic effect. In terms of photography I intend to use the backlight aswell as the key and fill light as to produce a full three-dimensional effect that is really effective and interesting. These images of my characters could in turn be used on my poster or magazine double page review.
The technique uses three lights called the key light, fill light and back light:
Key LightThis is the main light. It is usually the strongest and casts the most light on the scene. It is placed to one side of the camera/subject so that this side is well lit and the other side has some shadow.
Fill Light
This is the secondary light and is placed on the opposite side of the key light. It is used to fill the shadows created by the key. The fill will usually be softer and less bright than the key. To achieve this, I would intend to place some white sheeting over my light to diffuse it and soften the brightness.
Back Light
The backlight is placed behind the subject and lights it from the rear. Rather than providing direct lighting (like the key and fill), its purpose is to provide definition and subtle highlights around the subject. This set up would not be suited to my film because there would be too many cameras so I couldn’t create any movement with the camera. However, for still photography I think that this technique will become very useful.
So, for my filming, I intend to use either the key and fill light together to fully light my scene and actors. Lighting in film is only really necessary when using a 35mm camera to get the right exposure, but in digital film cameras such as DSLRs, this doesn’t matter, but low light shooting can produce a very grainy effect that could be suited to my film. For some of my scenes, such as when the Elder passes away could be done with just the key light to really cast shadows and create dramatic effect. In terms of photography I intend to use the backlight aswell as the key and fill light as to produce a full three-dimensional effect that is really effective and interesting. These images of my characters could in turn be used on my poster or magazine double page review.
Monday, 6 February 2012
Multi-camera research
A film shoot requires the use of a camera to record the film's shots, scenes, and sequences. Shot are the building block of cinema. During editing, these shots are arranged in a creative progression to tell a story. A scene is composed of a series of continuous shots related to one another's basic action or situation. These continuous shots are regarded to have a particular impression that involves the same set of characters and setting. Meanwhile, a sequence is made up of scenes situated in the same location and plotpoint in the story. It follows a specific order in which a related topic and specific events and actions follow each other in a logical progression. There are many ways of going about filming scene like this. The two main ones are:
A one camera shoot
This set-up is typically used in narrative films, mobile shoots, and documentaries. Since only one camera records the shot, the camera operator has more ability to move the camera around with less limitations caused by having to avoid seeing another camera simultaneously recording on frame. However, the main disadvantage of a one-camera set-up is how more time-consuming it is as covering all camera shots and angles would mean having to repeat shots more than a multi-camera set-up would require.
Having only one camera in a shoot can present a challenge with the film's continuity, especially when shooting very movement based scenes involving many characters and situations. For instance, a scene inside a classroom, a market, or any other relatively dynamic setting would mean having to exactly copy the initial reactions of the characters and replicating difficult to repeat shots like stunts and anything action related.
Multi-camera Shoot
Using two or more cameras is primarily used in talk shows, news programs, and other live programs that are set-up in a studio or any other controlled location. Yet, it can also be used in TV dramas and films set in varying locations, especially those that find it more practical to shoot certain shots in different angles and shot distances without having to frequently repeat the entire set-up. This allows two or more cameras to shoot the footage with perfect continuity coming from the cameras' simultaneous recording.
 A multi-camera shoot can also be referred to as a two-camera or three-camera shoot. These two are typically used in many productions. Scenes that are heavily dialogue based, such as Scene 3 in my film could also be shot using a multicamera setup so that the actors can just run through the scene without having to stop and start.
This set-up is typically used in narrative films, mobile shoots, and documentaries. Since only one camera records the shot, the camera operator has more ability to move the camera around with less limitations caused by having to avoid seeing another camera simultaneously recording on frame. However, the main disadvantage of a one-camera set-up is how more time-consuming it is as covering all camera shots and angles would mean having to repeat shots more than a multi-camera set-up would require.
Having only one camera in a shoot can present a challenge with the film's continuity, especially when shooting very movement based scenes involving many characters and situations. For instance, a scene inside a classroom, a market, or any other relatively dynamic setting would mean having to exactly copy the initial reactions of the characters and replicating difficult to repeat shots like stunts and anything action related.
Using two or more cameras is primarily used in talk shows, news programs, and other live programs that are set-up in a studio or any other controlled location. Yet, it can also be used in TV dramas and films set in varying locations, especially those that find it more practical to shoot certain shots in different angles and shot distances without having to frequently repeat the entire set-up. This allows two or more cameras to shoot the footage with perfect continuity coming from the cameras' simultaneous recording.
 A multi-camera shoot can also be referred to as a two-camera or three-camera shoot. These two are typically used in many productions. Scenes that are heavily dialogue based, such as Scene 3 in my film could also be shot using a multicamera setup so that the actors can just run through the scene without having to stop and start.
A multicamera shoot can be a lot less time consuming depending on what kind of scene you're filming. For instance, I think that all of my hospital and 'limbo' scenes will be shot with more than one camera going at one time, to help let the acting flow better, whilst also saving time and creating a smooth continuity. The only issue with using more than one camera, is the editing process and having to match up audio to many different video clips. Although a little time consuming, I feel that this will really pay off.
Sunday, 5 February 2012
Location
Like many social realist dramas, my film is going to be entirely shot on location as opposed to the hospital scene being set up in a studio. This isn’t necessarily due to lack of budget, but my choice as a director to create a very real film, with dialogue being recorded on set too.
As Mike Figgis sums up in ‘A guide to digital film making’ (2004), ‘When looking for a location you need to consider many things, the obvious ones being ‘Is this the place that would suit your film best?’ ‘Does it look cinematically good?’ But you also need to consider questions such as ‘Will your crew fit into the space?’ ‘Where can your actors wait when they’re not being filmed?’ and ‘Is there anything that’ll compromise the period your film is set in and give away that sense of verisimilitude?’ Mike Figgis’s point is a very valid one, and consequently when I have been looking for locations for my film, all of these things have been taken into account, not only for the practicality of filming, but the way it looks on screen too.
To start at the beginning, scene 1 in my film is split into two locations. The first being the hospital to which the third scene is also set and the second is the empty scene which is meant to be set in limbo, this is the same as scene 4. I had to find a place that I could make look like a hospital or a room that was very clinical. Back in my AS Photography, I did a photo shoot in the hair and beauty section of the school, up at an industrial estate called Woods Browning. I did it to explore the issue of asthma and how I had been hospitalised by it in the past. The room that I used was a hair and beauty treatment room, which looked like a hospital in a very clinical way, so I went and asked if the people who run the vocational courses if I could film in it, and they were very co-operative and gave me dates when I could film there.
For the second half of scene 1 and all of scene 4, I needed to find a empty, bleak space that would symbolise limbo/heaven/a dream-like state before death. My initial thoughts were to book out the drama studio on the school site, set up a bed in the studio space and kindly ask one of the technicians to set up one powerful spotlight on the bed, giving the illusion that the bed is the only thing masked in light, surrounded by the dark. I went to talk to the head of the drama department about when I could book out the studio, and she told me that there would be a big delay because of the sheer amount of productions and classes that would be going on in that room. With this in mind, by photography teacher told me of a really old bleak worn out industrial unit up at Woods Browning that I could film or take photos at. He had the key, so I decided to go and have a look. The location was a large room that let in a lot of light, but it was very dilapidated, dusty and worn out. In my mind, I thought that I could bleach bypass the footage that I get in there to make it seem really bright and set up a light to help create mood and atmosphere.
 Moving onto scene 2, I knew that this was the only scene that I would be filming outside and with this in mind, I know I have to be careful of the weather. I went looking through various locations, such as Delphi Bridge on Bodmin Moor, but I decided that it was too open with a road that was near by possibly causing audio disruption. I had a think, and decided to travel to Respryn Woods and have a walk around to find somewhere that was suitable. There is a photo of the place I have chosen on the right. With a river near by, I knew that this location would be more suited to the script than Delphi Bridge.
Wednesday, 1 February 2012
Costume
Costume
For my costume I wanted to keep it all relatively low key. Although some scenes would technically be set a long time ago, I knew that if I kept the costumes very basic, then the question of time periods wouldn’t arise. If I had an extended budget, I would probably try and afford costumes that would have been worn in the 1960’s or 50’s to help create a better verisimilitude, but I think that with plain costumes this won’t be an issue.
After bearing in mind the costumes from other existing similar media projects, you can see that all the cast tend to have plain costumes due to their social realist nature, it’s focused heavily on the acting, not necessarily the way the actors look. A great example of this is Tyrannosaur by Paddy Considine, which consists of really two main characters whose costumes are so socially real that you don’t even remember what they were wearing due to their powerful performances.
From this I have written a costume list of what I will expect my actors to wear:
The Child (Scene 1 and 4):
Plain white T-shirt
Black trousers
Any shoes
The Child (Scene 2):
A plain coloured t-shirt.
Jeans
Wellies
The Child (Scene 3):
A plain coloured t-shirt.
Jeans
Any shoes
The Elder (Scene 1, 2 and 4):
A white shirt
White golfing trousers
Any shoes.
The Brother (Scene 3):
White T-Shirt
Jeans
White socks
For a majority of these characters, I knew that what shoes or trousers that they wore wouldn’t matter when filming, because the camera wouldn’t see them in shot. For instance, the Elder’s shoes in Scene 2 or the Brother’s jeans in Scene 3.
The colour white plays a huge part in my production as it signifies heaven and innocence. The use of the elder wearing white in scene 2, is to symbolise the fact that he isn’t actually there, he is a ghost, merely observing. I wanted both the child and elder to be wearing white in scene 1 and 4 because I knew that I would be completely washing out the scene and making it bright and their costumes would fit in the whole theme of limbo and a dream-like space that I am trying to create.
Saturday, 21 January 2012
Magazine Flat Plan
Magazine Flat Plan
This is my flat plan for the magazine double page that I intend to create in Adobe Indesign CS5.5. I have taken conventions from existing film magazines such as Empire and Little White Lies, such as the round corners on the main image, as seen in LWL and the symmetrically of the double page layout with the use of four columns to fill up the page.
This is my flat plan for the magazine double page that I intend to create in Adobe Indesign CS5.5. I have taken conventions from existing film magazines such as Empire and Little White Lies, such as the round corners on the main image, as seen in LWL and the symmetrically of the double page layout with the use of four columns to fill up the page.
Friday, 20 January 2012
Poster Flat Plan
Poster Flat Plan
This is my flat plan that I have decided to draw to show how I am going to design my poster for my short film. I have decided to follow conventions such as star ratings, brief statements, the lead characters, location, title and age rating.
This is my flat plan that I have decided to draw to show how I am going to design my poster for my short film. I have decided to follow conventions such as star ratings, brief statements, the lead characters, location, title and age rating.
Thursday, 19 January 2012
The relevance of new technology to my short film
In this post I am going to explore the ever advancing power of media technology and how the increasing availability of production tools influenced the creation of my short film ‘Solitude’. When in the production stage of my film, I will be using a Canon 60D camera and Final Cut Studio for editing, equipment that can be used for professional results, but available to a public audience. These are points that I will be covering in this post, whilst also relating back to my five-minute short film.
Technology is ever advancing, none more influential and apparent then that of the media industry.
 The age of digital technology has arrived, we can watch films on computers, read papers, books, put anything we like on the world wide web, watch 3D HD TV on 90 inch screens from the comfort of our homes. In terms of film, the industry is still dominated by the classic 35mm film way of shooting, which although expensive, gives fantastic quality thus making it the industry standard camera. Low budget films would normally be filmed on tape, something that is fast becoming obsolete due to the recent introduction of DSLRs that can take glorious full HD film straight onto SD card for a very reasonable price. These are great for amateur and freelance filmmakers, but are they used in the professional field? Yes they are. A recent season finale to American hit TV program ‘House’ was filmed entirely on a Canon 5D Mark II, a top of the range stills camera which gives glorious quality footage with a wonderful shallow focus pull, no tape or film was used in the making of this particular episode. For instance, my coursework project last year was a horror film called ‘Wuthering Heights and Werewolves’ that was shot completely on Mini DV Tape. But now, only a year later I am filming in Full HD onto a SD Card instead of ‘low quality’ tape.
 “The making of the new and the re-arranging of the old” (Bentley 1997). In this quote, Bentley says that in order to create a product that is fit for purpose you have to carefully research the conventions of existing media texts that are from a similar genre, and pitched at a similar target audience, to the product/products you intend to produce. But, if you’re re-arranging the old the technological advances are going to be quite different in my medium of film. In the short films that I analysed, such as ‘The Siren’ by Alex Nevill, were all shot on DSLR cameras, such as the Canon 7D giving the films a professional high quality and depth of field to match. I followed the conventions of these short films by also shooting on a DSLR, a mid range Canon 60D which puts the high quality footage straight onto SD card, giving fast, tape less recording. For my editing I used a program called Final Cut Studio, used to edited films such as ‘300’, ‘The Social Network’, ‘Jarhead’ and ‘X-Men’. This product is a simple to use, professional standard program which I personally brought before I began editing my film. A week or so after I spent money on this program, a totally new version came out, which puts into perspective the advancing technology in editing and the professional film industry. Most film editors don’t use Final Cut Pro, but use a program called Avid Media Composer, a more expensive and complicated film editing solution. This program has been around for longer than Final Cut; therefore, just like 35mm film, people still seem to use it as a professional grade way to edit their films. Putting these products at a relatively low price makes them available to the mass public, which is something that really benefited me in the making of my film.
 Gauntlett (2007) says that new media (and new media technologies) erodes the boundary between producer and audience to the extent that it makes little sense to talk about media audiences at all anymore: “Conventional research methods are replaced—or at least supplemented by new methods which recognise and make use of people's own creativity, and brush aside the outmoded notions of 'receiver' audiences and elite 'producers'”. With the availability of professional grade products, what stops any of the general public being a filmmaker? Therefore your audiences are no longer ‘receivers’ but ‘producers’. In my opinion, this has impacted my film in a very positive way, because as a low budget filmmaker I can now make a professional grade product, without the Hollywood budget. Examples of these equipment are the rise in DSLR filming, Final Cut Pro and special effects tools like Adobe After Effects.
When new media technologies are concerned, distribution within the postproduction of the film industry is an interesting area. In this digital day and age, piracy is a huge problem; with a whole spectrum of illegally uploaded films available online, filmmakers need a plan to how they release their products on the market. When low budget film makers can’t get funding from media conglomerates or huge production companies, digital technology makes life easier for them to reach a wide audience, through websites such as the UK Film Council, the UK Media Desk, BBC Film Network and Big Film Shorts who can host films online and have a big influence over film festivals, therefore promoting low budget films and reaching a great audience. “A new generation of UK media power players are ditching the traditional gatekeepers and going straight to their audience via the web” (Plunkett 2008). This brings me to a big point, that of online distribution which is becoming a popular method of reaching the masses, not just in film, but also in all of the media, TV, papers and magazines. Films can be released online, uploaded and streamed from websites such as Youtube, Vimeo or Dailymotion or purchased from the iTunes store.
 My film will be uploaded to sites like Vimeo, so that people can see what I have created, whilst also posting links to it on social networking sites to gain more interest. The use of social networking site such as Facebook also helped me to get my audience research when in the preproduction stages of creating my film, something I wouldn’t have been able to research into more than two years ago.
Even the methods of using files to research and present coursework have changed. For instance, my media coursework this year was all done digitally whereas only a year ago, the same media coursework was all done on paper format and submitted the traditional way. The reason that my recent coursework is laid out in a blog format is because of the ever-changing advancements in technology and the accessibility of being able to access and view my work from any computer.
The fact my work will be all online also creates less paper usage and whilst not doing damage to the environment, also creates less confusion searching through each sheet in a place that I know is secure and I won’t lose it.
 Another important reason is that the media industry is so fast paced that to be part of it you really need to keep up with the different methods within the industry, and within the past five years, blogging has become more and more popular with more and more relevance to our subject.
To sum up, I feel that the advance in new media technologies really seems to work in my favour, as it has reduced the cost of products that would have been thousands of pounds a few years back, therefore making them more available to people such as me. With the use of this new technology being available, I believe I have created a professional grade film using cameras, online distribution and editing software.
Technology is ever advancing, none more influential and apparent then that of the media industry.
 The age of digital technology has arrived, we can watch films on computers, read papers, books, put anything we like on the world wide web, watch 3D HD TV on 90 inch screens from the comfort of our homes. In terms of film, the industry is still dominated by the classic 35mm film way of shooting, which although expensive, gives fantastic quality thus making it the industry standard camera. Low budget films would normally be filmed on tape, something that is fast becoming obsolete due to the recent introduction of DSLRs that can take glorious full HD film straight onto SD card for a very reasonable price. These are great for amateur and freelance filmmakers, but are they used in the professional field? Yes they are. A recent season finale to American hit TV program ‘House’ was filmed entirely on a Canon 5D Mark II, a top of the range stills camera which gives glorious quality footage with a wonderful shallow focus pull, no tape or film was used in the making of this particular episode. For instance, my coursework project last year was a horror film called ‘Wuthering Heights and Werewolves’ that was shot completely on Mini DV Tape. But now, only a year later I am filming in Full HD onto a SD Card instead of ‘low quality’ tape.
 “The making of the new and the re-arranging of the old” (Bentley 1997). In this quote, Bentley says that in order to create a product that is fit for purpose you have to carefully research the conventions of existing media texts that are from a similar genre, and pitched at a similar target audience, to the product/products you intend to produce. But, if you’re re-arranging the old the technological advances are going to be quite different in my medium of film. In the short films that I analysed, such as ‘The Siren’ by Alex Nevill, were all shot on DSLR cameras, such as the Canon 7D giving the films a professional high quality and depth of field to match. I followed the conventions of these short films by also shooting on a DSLR, a mid range Canon 60D which puts the high quality footage straight onto SD card, giving fast, tape less recording. For my editing I used a program called Final Cut Studio, used to edited films such as ‘300’, ‘The Social Network’, ‘Jarhead’ and ‘X-Men’. This product is a simple to use, professional standard program which I personally brought before I began editing my film. A week or so after I spent money on this program, a totally new version came out, which puts into perspective the advancing technology in editing and the professional film industry. Most film editors don’t use Final Cut Pro, but use a program called Avid Media Composer, a more expensive and complicated film editing solution. This program has been around for longer than Final Cut; therefore, just like 35mm film, people still seem to use it as a professional grade way to edit their films. Putting these products at a relatively low price makes them available to the mass public, which is something that really benefited me in the making of my film.
 Gauntlett (2007) says that new media (and new media technologies) erodes the boundary between producer and audience to the extent that it makes little sense to talk about media audiences at all anymore: “Conventional research methods are replaced—or at least supplemented by new methods which recognise and make use of people's own creativity, and brush aside the outmoded notions of 'receiver' audiences and elite 'producers'”. With the availability of professional grade products, what stops any of the general public being a filmmaker? Therefore your audiences are no longer ‘receivers’ but ‘producers’. In my opinion, this has impacted my film in a very positive way, because as a low budget filmmaker I can now make a professional grade product, without the Hollywood budget. Examples of these equipment are the rise in DSLR filming, Final Cut Pro and special effects tools like Adobe After Effects.
When new media technologies are concerned, distribution within the postproduction of the film industry is an interesting area. In this digital day and age, piracy is a huge problem; with a whole spectrum of illegally uploaded films available online, filmmakers need a plan to how they release their products on the market. When low budget film makers can’t get funding from media conglomerates or huge production companies, digital technology makes life easier for them to reach a wide audience, through websites such as the UK Film Council, the UK Media Desk, BBC Film Network and Big Film Shorts who can host films online and have a big influence over film festivals, therefore promoting low budget films and reaching a great audience. “A new generation of UK media power players are ditching the traditional gatekeepers and going straight to their audience via the web” (Plunkett 2008). This brings me to a big point, that of online distribution which is becoming a popular method of reaching the masses, not just in film, but also in all of the media, TV, papers and magazines. Films can be released online, uploaded and streamed from websites such as Youtube, Vimeo or Dailymotion or purchased from the iTunes store.
 My film will be uploaded to sites like Vimeo, so that people can see what I have created, whilst also posting links to it on social networking sites to gain more interest. The use of social networking site such as Facebook also helped me to get my audience research when in the preproduction stages of creating my film, something I wouldn’t have been able to research into more than two years ago.
 Even the methods of using files to research and present coursework have changed. For instance, my media coursework this year was all done digitally whereas only a year ago, the same media coursework was all done on paper format and submitted the traditional way. The reason that my recent coursework is laid out in a blog format is because of the ever-changing advancements in technology and the accessibility of being able to access and view my work from any computer.
The fact my work will be all online also creates less paper usage and whilst not doing damage to the environment, also creates less confusion searching through each sheet in a place that I know is secure and I won’t lose it.
To sum up, I feel that the advance in new media technologies really seems to work in my favour, as it has reduced the cost of products that would have been thousands of pounds a few years back, therefore making them more available to people such as me. With the use of this new technology being available, I believe I have created a professional grade film using cameras, online distribution and editing software.
Sunday, 15 January 2012
Audition
Here is an audition by my friend Joe for the part of the brother. I personally decided that Joe wasn't suited to the part, and I believe that his acting wasn't as good as Dan Annear's, due to his stammering, lack of facial expressions, looking at the camera and forgetting his lines.
Wednesday, 11 January 2012
Casting
 After watching films with such powerful subjects, such as ‘Hunger’ by Steve McQueen or ‘Tyrannosaur’ by Paddy Considine, you can really see how the use of acting in such a powerful manner can really influence your film in a really positive way. From analysing the success of these independently British films, you can see that the actors have won more awards then the director. For instance, Olivia Colman’s harrowing performance in ‘Tyrannosaur’ won numerous titles, such as best female lead at the British Independent Film Awards. This film is exactly the target audience that I would aim for; Social grade C and above, the kind of people that would watch independent films, or attend film festivals.
Acting can make or break your film, and with this in mind, I have decided to audition actors for my film. I have approached the drama department at my school and asked for two actors, one of about Year 7 – 8, and one who would be this person’s brother, about Year 12 – 13. The head of the drama department let me know about outstanding actors in these age groups, and subsequently I tried the suggested actors. The first, Jake Clutsom (age 12), was very keen to be involved so we exchanged contact details and I gave him a copy of my up to date script. I gave him about a week to read through it, and then met up with him again to see what he thought. I know that having a good director to actor relationship can really make your film work. I asked him if there was anything that he understood, or particularly didn’t understand, because my script is very surreal and I can’t say that I was too sure of Jake’s level of understanding. He seemed to understand and like the part, so I told him that I would let him know when I would need him for filming.
My next actor, Dan Annear (16), would be playing the part of the brother, a particularly difficult part to play in a hospital bed. I knew that if his particular monologue was delivered perfectly, then this could really make his scene spectacular. I caught up with Dan, and discussed the possibility of being in the film. He was very enthusiastic, and I told him that I would like him to audition for me, which I have filmed. I thought that the audition was fantastic. He was everything that I envisioned the brother to be like, he loved the script, he was keen and we got on well. The part of the brother, although hard, unlike the part of the child, is only brief. After auditioning Dan, I knew that he would make the most out of his brief time on camera, by giving a fantastic performance.
Claude Levi-Strauss was a structuralist philosopher who was fascinated with how much the world is described in terms of opposites (“binary opposition”) – night/day, good/bad, light/dark, good/evil etc. He observed that these oppositions tended to structure texts narratives. Through using contrasts between ages with two of my characters, I also used Claude Levi-Strauss’ Binary Opposition theory to help structure my narrative and create a far more intriguing storyline, that’d really draw the audience in.
Subscribe to:
Comments (Atom)